
Guide
Scan a document with the Notes app
Open Notes and open a note. Tap the Attachments button (the paperclip), then Scan Documents. Set Flash or Filters if you want, hold the iPhone over the page and keep it steady: it captures automatically. Scan more pages, then tap Done. The document is saved as a PDF inside the note. To send it as a file, tap the Menu button on the scan and choose Share.

Scan a document into a note
These are Apple’s steps for iOS 26 and 27 (the iPhone User Guide for iOS 27, and Apple’s support article published February 13, 2026).
- Open Notes and open a note, or create a new one.
- Tap the Attachments button (the paperclip), then tap Scan Documents. Or tap the More button in the note, then Scan.
- Hold the iPhone so the page appears on the screen. Adjust Flash or Filters if you want to.
- Capture the page:
- Automatic: keep the iPhone steady. It captures the page when it detects the page boundaries. To change a page, tap its thumbnail, tap an option such as Adjust, make your changes, then tap the Back button.
- Manual: tap the automatic capture button to turn it off, then tap the Take Picture button (or press a volume button). Adjust the corners, then tap Retake or Keep.
- Scan more pages, then tap Done.
The document is saved as a PDF in the note. In iOS 17, the same scanner sits behind the Camera button in a note.
Scan Text is something else
The same menu has Scan Text. It reads the words in front of the camera (in supported languages) and inserts them as typed text in the note, with no image. Use it to capture a paragraph or an address; use Scan Documents to keep a copy of the page itself.
Where the scan lands
The PDF lives inside the note, not in the Files app. It goes wherever that note goes: if the note is in your iCloud account, the scan syncs to your other devices signed in to the same Apple Account; if it’s in the On My iPhone account, it stays on the phone.
A tip: make one note per document or per topic (“Car: insurance and registration”), with a clear title. Notes lists notes by title, not by what’s in the scan.
Edit the scan
- In the note, tap the Menu button on the scan.
- Tap View As and choose Medium or Large to work on pages. Quick Look opens it full screen.
- To edit one page, tap its thumbnail, tap the More button, then choose Rotate Left, Rotate Right, Filters, Crop Page or Insert Blank Page. Apple notes that Filters and Crop Page work only on scanned documents.
The Menu button also lets you rename the PDF, which is worth doing: the name travels with the file when you share it.
To mark up or annotate, tap the Handwriting Tools button on the scan and use Markup.
Sign a scanned document
- Tap the document in the note.
- Tap the Markup button.
- Tap the Add button, tap Signature, and choose a saved signature or create one. Resize the box and place it.
- Tap Done.
To sign by hand instead, pick a drawing tool in Markup and sign with your finger. More in signing a PDF on iPhone.
Share it as a PDF
- Tap the Menu button on the scan.
- Choose Share, then Mail, Messages, AirDrop or Save to Files.
Share the scan, not the note. Apple’s guide warns that exporting a note as a PDF (Share, then Markup) includes only the first page of a multipage scan. Fuller steps for getting a clean PDF out are in scanning a document to PDF.
Find it again
Notes search looks inside scans. Tap the Search button in the notes list and type a word that appears on the page; Apple says the search covers text in scanned documents. Inside a long note, tap the Note Actions button, then Find in Note, and turn on Include Attachments to search the PDF too.
Scan into a shared note
If a note is shared with family, a scan you add appears for them too, and Apple notes that people you share with see markups and changes as you make them. That’s handy for a household paper everyone needs, such as the babysitter’s emergency sheet. It also means anything you scan into a shared note isn’t private.
Notes’ limits for documents
Notes is a good scanner and a fair filing place for a few papers. It gets harder as the pile grows:
- Names are up to you. Rename each scan from its Menu button, or a long list of scans gets hard to tell apart.
- Locking may not be available. Apple’s list of notes you can’t lock includes notes with PDF or file attachments.
- It isn’t a file system. To upload a scan to a website, you share it to Files first.
If you want the PDF as a file from the start, scan in Files instead: see scanning straight into the Files app.
Where Scanner One helps, and where it doesn’t
Notes captures well; what it leaves to you is naming, filing and protecting. Point your camera at any piece of paper. Scanner One finds the edges, straightens the page, cleans it up and saves a real PDF. Then it reads the text, names the document, tags it and puts it in the right folder. Scanner One makes searchable PDFs.
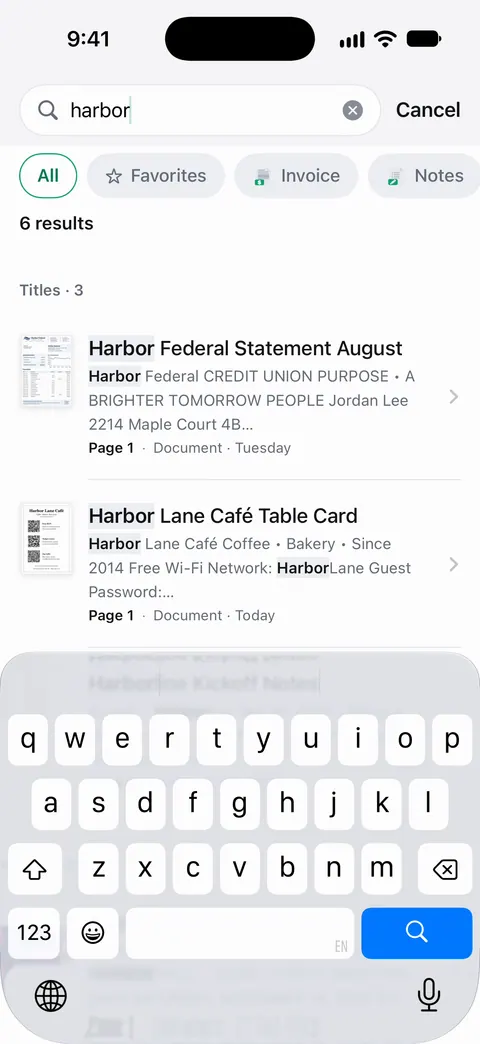
Search looks inside the text of every document and shows the matching line and page. You can lock the app with Face ID. Documents stay on your iPhone unless you share them or turn on iCloud Sync.
The limits: Free accounts get smart filing for 10 documents a month. Free accounts can sign and mark up 3 documents a month. On a free account, pages you share, print or export carry a small “Scanned with Scanner One” label at the bottom right. Pro removes it. Notes has none of those limits, and no label.
When Notes is enough: for a few scans you keep next to your notes, it’s free, built in and searchable. The full comparison is in Scanner One vs the Notes scanner, and the overview of every built-in scanner is in how to scan documents on iPhone.
Questions and answers
Where does Notes save scanned documents?
Inside the note you scanned into, as a PDF. It syncs with that note’s account, for example iCloud. It isn’t a separate file in the Files app until you share it and choose Save to Files.
How do I share a Notes scan as a PDF?
Tap the Menu button on the scan in the note and choose Share. Don’t export the whole note as a PDF: Apple notes that this keeps only the first page of a multipage scan.
Can Notes search the text in my scans?
Yes. Apple says Notes search covers text in scanned documents. To search inside one note, tap the Note Actions button, then Find in Note, and turn on Include Attachments.
What’s the difference between Scan Text and Scan Documents?
Scan Text reads the words in front of the camera and inserts them as typed text in the note. Scan Documents saves an image of the page as a PDF.
Can I lock a note with a scan in it?
Maybe not. Apple’s list of notes that can’t be locked includes notes with PDF or file attachments, and a scan is saved as a PDF. If Lock isn’t offered, keep the scan elsewhere.
Sources
What this page says about Scanner One was checked against the app on .
- Apple Support, How to scan documents on your iPhone or iPad (article 108963) — the Notes steps, the More button route, the iOS 26 flash and filter options, and signing with Markup; published 2026-02-13
- iPhone User Guide (iOS 27), Scan text and documents in Notes — Scan Documents and Scan Text, automatic and manual capture, saved as a PDF in the note; read 2026-11-13
- iPhone User Guide (iOS 27), Work with PDFs in Notes — View As, Quick Look, rename, share, and the page actions Rotate, Filters, Crop Page and Insert Blank Page; read 2026-11-13
- iPhone User Guide (iOS 27), Export or print notes — a note exported as a PDF keeps only the first page of a multipage scan; read 2026-11-13
- iPhone User Guide (iOS 27), Search through your notes — search finds text in scanned documents; Find in Note with Include Attachments; read 2026-11-13
- iPhone User Guide (iOS 27), Lock your notes — notes with PDF or file attachments can’t be locked; read 2026-11-13
- iPhone User Guide (iOS 17), Scan text and documents in Notes — in iOS 17 the scanner is behind the Camera button
- Scanner One on the App Store — the app’s own listing
Get Scanner One
Scanner One is free, with generous limits: scanning, clean PDFs and text search never stop.

Scanner OneScan, sign and ask anything
Scanner One is free, with generous limits: scanning, clean PDFs and text search never stop.